Kamis, 24 Mei 2018

Season Extension: Start Seeds Indoors


 by Ellyn Myller
The snow has gone from around the house, there’s been one decently warm weekend to putter in the yard, and a bed suffering from snow compaction has been readied for seeds that won’t be planted until the first week in June.  Even then the frost covers will be ready to throw on if the temperatures look to dip below freezing.   Our growing season is short in the valley so how do we get things to grow that take more days or growing degree units in which to mature? 

This can be accomplished by using season extension methods such as starting seeds indoors, green house growing, or lighted hoop houses over raised garden beds.  This year I am experimenting with starting seeds indoors.   It is recommended that you begin seeds inside 6-8 weeks before the last average frost, which is June 15 in Steamboat, right about end of April beginning of May.  I’m starting cabbage, butternut and acorn squash, broccoli, Brussels sprouts, and tomatoes.  I’ve started some peas too, although I’ve had good success directly sowing them and may do so to observe and compare results. 
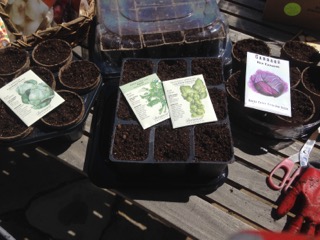
There are a variety of seed starting supplies available in the stores as well as seed starting potting mix, which is recommended.  The method I used was to dampen the potting mix in a large tub before putting it fairly densely into a variety of small 2- 3”pots.  I used cleaned and recycled nursery pots and chose degradable peat pots for the cabbage and peas to reduce transplanting shock.  Plant 2-3 seeds in each pot to insure to get one plant growing in each pot.  Plant the seed according to the depth on the seed package or a rule of thumb is no deeper than four times the size of the seed. 

          Water carefully.  Begin by simply misting with a spray bottle so as to not disturb the seeds.  Do not let the soil dry out, but don’t soak it either as this can inhibit seedling growth.  Cover with plastic sheets, the provided clear covers to purchased trays, even glass.  Place in a cool location 60-70 degree room, but not in direct sunlight until they have germinated.   Gradually move them into bright light.

After the seeds have germinated and display two true leaves (the leaves above the seed leaves), thin to one plant per pot by nipping off additional plants at the soil.  Maintain the plants’ water needs.  Over the course of 7-10 days prior to transplanting begin the hardening off process by taking the plants outside for a short to gradually longer period of time daily to expose them to wind/sun and help reduce transplant shock.  Reduce water as long as the plants are not wilting.  Transplant to the garden, continue water care and frost protection.

CSU Extension has a number of research based Fact Sheets to help you with garden planning and care.  For more details on this topic, please see:

·         Fact Sheet #7.409 Growing Plants from Seed

·         Plant Talk #1034 Starting Plants Indoors

Ellyn Myller is applying many things she learned from her 2017 Master Gardener training from crop rotation, seed starting, and “right plant – right place”.  She’s hoping for a prize-winning cabbage this year.

Kamis, 17 Mei 2018

Dividing Perennials


by Pat Tormey
“Many home gardeners have found that the process of division is more traumatic to them, the gardener, than it is to the perennial.” www.cce.cornell.edu/chemung

Ah, if only we could put in our flowering plants and forget them. Unfortunately, most perennials, those ‘backbones’ of the garden, may require occasional division in order to thrive.  As your plants grow over the years with new stems and new roots, they become over-crowded.  The plant may look larger, but each stem is actually smaller and weaker. 

If your perennial plants show any of the following, it may be time to rejuvenate them through division: 
1.          The flower quantity or flower size is reduced.
2.          The stems and branches are tangled.
3.          The center of the plant dies leaving a doughnut of new growth around the perimeter.
4.          The plant loses vigor, flopping over or requiring staking when it never did before, or the leaves are paler or yellow.
5.          The plant has out-grown the space you have given it.  This is especially likely if it grows in a particularly hospitable site.
6.          The plant is in the ‘wrong place’ in your garden.
7.          You want to share the bounty of your garden plants with friends and neighbors.  It is illegal to divide perennials that are patented.


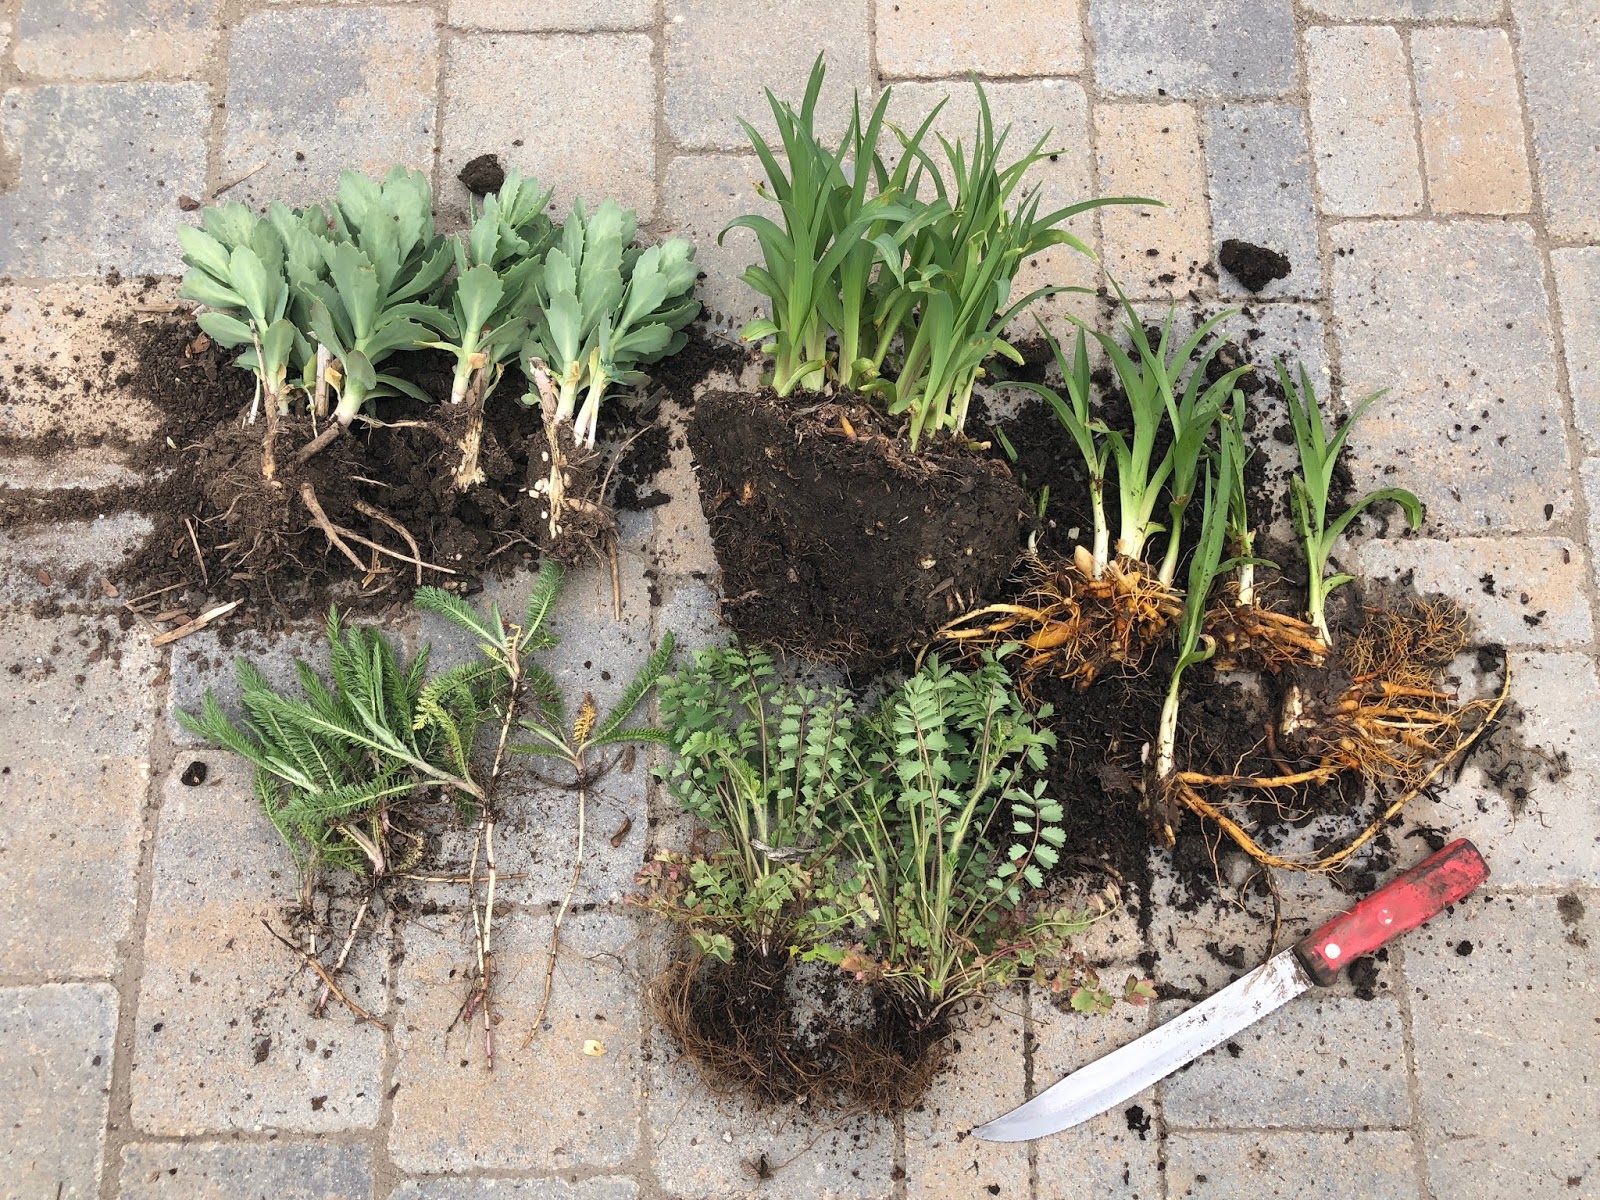
Starting from the top and going clockwise: Daylilies, whole and divided.  A fibrous-root plant, cut in half.  Yarrow just pulled apart.  Sedum pulled and cut as needed. 


Many perennials in our area do best by being divided in the spring – right now! The general rule is that summer and fall blooming plants should be divided in the spring, and spring blooming plants in the fall. 

Tips for successful division of fleshy, fibrous, tuber, and rhizome perennials

1.          The day before, water the plant thoroughly. 
2.          Try to select a day that will be overcast and not too hot.  Then work either in the cool of morning when the plant is fully hydrated or late afternoon when the night will allow for better recovery.  Exposed roots dry out quickly.
3.          Dig the hole the divisions are going into, or prepare pots for them.
4.          Some plants benefit by having their top foliage cut back, allowing you to see where the natural divisions occur when making your cuts and reducing the loss of water through the leaves after transplant.
5.          If the plant is large, use a spading fork to dig all the way around it, well away from the base to minimize the loss of roots.  A fork does less damage to the roots than a shovel or spade.  Then lift the entire clump out of the ground.  You may need to remove some of the dirt in order to see the root structure.
6.          If the whole plant doesn’t require division and you only want few new plants, you can dig or cut out clumps around the edges.  The parent plant will recover quickly and appear unchanged.
7.          Remove all weeds and grasses before you replant!  Inspect the plant for unhealthy parts, usually an old woody center or rotten roots.  Eliminate them. 
8.          For fibrous rooted plants, use a spade (or two), an old bread knife, or your fingers to separate the clump into plants the size you want.  Very old and well established perennials, like day lilies or astilbe may require more aggressive handling.  I have heard of people using saws!
9.          Keep the divisions moist and shaded.  Save the youngest pieces for replanting, usually the ones at the edge of the plant.  Each piece should have roots and a minimum of 2 buds / piece of the crown.  Discard the rest.  The larger the pieces, the sooner the plant will bloom again. 
10.       Plant each division in a hole twice its size.  Fill in with good quality soil mixed with organic matter, keeping the plant at its original depth.  Don’t feed with nitrogen until the following year ­- nitrogen encourages top growth and the divisions need to focus on their roots.
11.       Water well.  If the weather is especially hot and sunny, you may need to add a sunshade for a few days.

There are a number of other techniques for propagating plants, shrubs and trees: stem, leaf or root cutting, layering, grafting, budding, scaling, scooping, scoring, offsets, runners, etc.  They are beyond the scope of this article; but what fun they might be!


Pat Tormey retired and moved to Steamboat in 2014 where she quickly learned that raising plants in this environment was very different than the decades spent raising vegetables in the Midwest.  She took the Master Gardener class (2015) and has enjoyed learning more about gardening every year since.  Currently, Pat is helping out with the We Dig It! project, raising vegetables for Lift-Up at the Community Garden, and volunteering at a local farm-to-table project.


Kamis, 10 Mei 2018

Foothills Drought Conditions, Fire Mitigation and Plant Materials


By Jan Boone

Picture courtesy of Colorado State Forest Service

We all have watched with dread the fires that have ravaged both Northern and Southern California in the past months.  As someone with family members and friends impacted by several of these fires in my home state, I can’t help but think it’s time to re-examine the more serious aspects of safety in foothills living and our gardens, for the off chance our turn will be next.

According to the Colorado Climate Center, as of January 2018, 99% of our state’s population is being impacted by some degree of drought.  The Foothills and surrounding Metro area is still classified as Moderate, but as we all know weather patterns can impact us very quickly. This includes the scary fact our snowpack is currently between 50-70% of average.  Yes, our typical snowiest months are March and April, so as I write, we are halfway through March and we’ve only received half our normal snowfall.   Follow their website at (www.climate.colostate.edu).

Since our surrounding environment is heavily forested with peaks and canyons and our climate is arid, we’re at a high risk for wildland fire destruction  The potential of a wildland fire impacts most every aspect of our daily living.  Here’s a challenge: when was the last time you considered fire mitigation around your house and property??  Consider places where wildlands meet more urban-based building structures and how they can be defended against fire.

The Colorado State Forest Service (www.csfa.colostate.edu: https://static.colostate.edu/client-files/csfs/pdfs/FIRE2012_1_DspaceQuickGuide.pdf) has great guidelines on recognizing the Home Ignition Zones that starts with two basic principles: Structure Ignitability (your house and surrounding facilities) and Defensible space (the area around your home).  While it’s true your homeowner’s insurance may help point out potential hazards they see on and around your immediate house structure, there are still greenhouses, storage sheds, barns, etc. to also consider. Have you thought of little things that may prove impactful? Do you allow pine needles to collect under any raised wooden decks, or against your siding? What about your gutters?  Do you store items in potentially flammable containers up against the house?  What about the woodpecker holes in siding you say you’ll get to later or the big dead pine bough that overhangs the roof? These all may impact your dwelling in case of a wildland fire. 

Let’s also focus on the garden and space around your home. Do you worry about the dried cheat grass in a space next door? How about the small attractive pine you planted next to your house a few years ago?  The dried needles it may drop are trouble!! All of these circumstances are easy targets with potentially sad outcomes, especially in wind driven ground fires where sparks can ignite your plantings and house.  Do you watch for ladder fuels (i.e. dead pine boughs that start on shrubs, especially firs, at ground level and may rise 2-3 ft to current growth in a young trees.  These fuels enable sparks to quickly move vertically, easily turning a ground or grass fire into a crown fire at treetop level . 

Now turn your attention specifically to garden plants and landscaping.   (CSU fact sheet #6.305  on Firewise Plant Materials: extension.colostate.edu/topic-areas/natural-resources/firewise-plant-materials-6-305) We are often asked during the summer months “What plants won’t attract deer or elk”??  We can turn that question around for the purpose of this blog article and ask “What plants are more fire resistant”??  If we think of your home’s exterior space in Zones, there are 3 Defensible Space Zones: Zone 1 is 0-15 feet from your structure, Zone 2 is 30-100 feet from your structure. And Zone 3 100 feet and beyond.  Here’s some added information to help.

                                                           
Picture courtesy of Colorado State Forest Service
                           
If you you’re collecting water in Zone 1, as in a rain barrel (CSU Fact Sheet # 6.707: http://extension.colostate.edu/topic-areas/natural-resources/rainwater-collection-colorado-6-707/) or maybe a water feature with a pool, you may want to consider keeping a good hose nearby, especially to help spray water on the base of the house or to water plants near the house.  A good friend in Napa did this using water from a swimming pool to help save a wood fence!  However, if you are asked to evacuate, do so immediately without taking time to soak anything.   Look for low growing ground covers and some wildflowers for this specific zone.

Zone 2 and 3 plantings may be subject to loss or damage from a wildland fire despite best efforts, but you can help protect the Zone 2 garden occupants by following these guidelines found in above referenced Fact Sheet on Firewise Plants.  Look for plants with these specific characteristics: open branches and sparse vegetation, low sap or resin contents and good moisture content. While eliminating dead or dying branches or dried diseased leaves is work, the payback is a healthier garden as well as less available volatile materials in case of fire.  Zone 3 is apt to be native growth, including tall pines.  This zone may be a priority of first responders in case of a wildland fire.  Consider and ask about plants or trees that may regenerate themselves after a fire.

Here are some good low water, native wildflowers and plants that may be suitable while also creating a reduced water need in a fire wise garden. These are also beneficial to pollinators.  A fact sheet that can help with this is Native Herbaceous Perennials for Colorado: http://extension.colostate.edu/topic-areas/yard-garden/native-herbaceous-perennials-for-colorado-landscapes-7-242/.  Also, low-water native plants for pollinators: extension.colostate.edu/docs/pubs/native/FrontRange.pdf.  In early growing season at our altitude, look for Nodding onion, Firecracker or Blue Mist Penstemon  and Pasque flower to name a few. Mid to late season you can also include Milkweed, Harebells, Blanket flower (Gaillardia), Beebalm, Black-eyed Susan, native Yarrow, Aster, Oriental Poppy, even Hens and Chicks. Specific shrubs varieties  may also include Rabbitbrush, Chokecherry, Golden Currant and Woods Rose, Cotoneaster, Serviceberry, Aspen. some maples and Mountain Ash.
                                                                                     

Native Yarrow

                                                                               
The Evergreen Volunteer Fire Department is hoping to hire a wildland fire educator in the coming months so watch for further information we can share should this hiring occur.  In the meantime, prepare as best you can with some of the ideas mentioned in this article.  Here’s wishing everyone a peaceful and safe season in our gardens and surrounding communities these coming months.  To those who may be called upon to help protect us in case of emergencies, we honor your commitment and thank you.


Senin, 07 Mei 2018

Keeping a Garden Journal


by Adele Carlson
     Recently I was sitting here looking out at the snow falling with seed catalogs laid out all over my desk, thinking about planning this year’s garden.  What should I grow? When should I plant? What goes in the greenhouse and what goes outside?  What worked last year?  What didn’t?  Should I try something new this year?  Fortunately, my old garden journals will help me with these tough questions.
     Over the years working in the gardens at The Home Ranch I realized that here in Routt County we really live in a unique area and our growing season doesn’t always fall in the guidelines of published planting guides; our best information comes from our own experiences.  Creating your own journal or planting guide will be of great value over your years of gardening in Routt County.
     There are many different types of journals to choose from but I recommend starting with either a simple planning type calendar that lists the months and dates, but does not include the days, or use a completely blank journal and create your own gardening calendar.   Both will allow you to make entries under a date in subsequent years, color coding each year with a different color ink.  After a few years, you will have made your own planting guide. 
     What to include in your journal? The list is endless, and the more you include the better your personal guide will be down the road.  Here are a few ideas to start:
·   Latest frost date and earliest frost date…and any that may occur in between
·    First spring sightings – when the first crocus pops up, when the garlic you planted last fall emerges, when the tarragon comes back (it is always so late I am sure it died over the winter)
·   When you start seeds inside and then transplant them out,  noting how those seedlings did inside and how they made the transition to outside
·   When you direct seed crops outside
·    How much rain falls and when
·    How you prepare your soil, what soil amendments you use and the date(s) you amend it
·   What you plant each year
·    Crop successes….and failures, noting ideas for improvement in the future
·    Crop rotation, throughout the season and from year to year
·    Companion planting trials
·    Diagrams and photos:  your garden plan, where you use crop rotation, bugs you encounter and the damage they do, etc.
·   What plants you like and don’t like and why
·    Information on plants you purchase so you can get them again if they are a success
     OK, time to start your journal!  It can be as simple as stashing your collection of garden notes written on scraps of paper in a notebook.  Or it can be a calendar I’ve just described.   Or you can create a work of art and include little botanical illustrations along the edges.  In the end, you will know what it takes to garden successfully in Routt County!  Now I am off to start a new journal of my own.
Adele Carlson has been a Master Gardener since 2007.  She lives, gardens and ranches in North Routt.  She originally took the Master Gardener class to learn more about weeds and rangeland management, but since has focused on vegetables and flowers.


Jumat, 04 Mei 2018

Preparation for 2018 Planting


by Ed Powers
I live in the Evergreen/Conifer area at about 7600 ft.  I have lived on several areas of the Midwest and West and gardened in all of them. But I find this area to be the most challenging and fulfilling.  I have learned that you should buy plants that grow fast and bloom or fruit in a short period of time.  Also, do not put them out too early and make sure they are hardened off when planting them.  I have always had to do this but it is more critical at our elevation.  Also, it is not a good idea to plant before June 1 unless you are planting cool season crops, such as root crops or some types of lettuce, cabbages, or spinach.

So, after 6 years of gardening here, reading and experimental planting this what I have come up with:
·        ·    I clean my 2 raised gardens in late fall or very early spring.
·        - I bring in some tomato plants when the season is over with and grow them inside.
·    I plant beet, rutabaga, turnips and carrots in mid-March.
·    I plant the other seeds I want to put in my gardens indoors in a well-lit area of my basement.
·    I start my smallest flower and vegetable seeds in peat pots with starting soil and my larger seeds in starting sponge inserts.

·    I cover them for at first and when they have sprouted and have the first set of leaves I uncover them.
·    I transplant large plants in bigger peat pots as needed.
·    In early May I will clean my wife’s deck railing pots and ready them for flowers.
·    In mid-May I start putting my plants out to harden the off.  I put them out in dappled shade at first so they don’t get too much sun, and gradually give them more sun. At first, I may bring them inside in the evening or I may choose just to cover them.
·    In late May or early June, I plant my gardens.
·    At this time, I also trim back the tomatoes I overwintered in the house and replant them.
I then water, fertilize and tend them for the summer-hope for a good crop and pretty flowers. 


Minggu, 29 April 2018

TEKNIK MENYEMAI BIBIT CABAI DALAM KOKER DAUN PISANG

http://tipspetani.blogspot.com/2018/04/teknik-menyemai-bibit-cabai-dalam-koker.html

http://tipspetani.blogspot.com/2018/04/teknik-menyemai-bibit-cabai-dalam-koker.html

Benih cabai hibrida sebenarnya dapat saja disemaikan dengan cara disebar. Namun, dengan pertimbangan ekonomis, cara sebar akan sangat merugikan karena mengingat harga benih cabai hibrida sangat mahal. Dengan sistem sebar, tidak semua bibit dapat dipakai. Padahal satu benih hibrida harus dapat menghasilkan satu bibit tanaman. 

Kelebihan bibit cabai hibrida adalah sebagai berikut : 
  1. Pertumbuhannya sangat cepat dan berumur genjah (masa panen relatif pendek. 
  2. Sangat responsif terhadap perlakuan pemupukan tinggi. 
  3. Kualitas atau mutu buah lebih bagus dari pada cabai biasa dan bobotnya lebih berat. 
  4. Dengan perlakuan yang sama, produksi per tanaman maupun per luas areal lebih besar dari pada cabai biasa. 

Kekurangannya sebagai berikut : 
  1. Peka terhadap serangan hama dan penyakit 
  2. Biaya yang diperlukan untuk perawatan lebih besar karena membutuhkan perawatan yang intensif. 
  3. Bibit dari tanaman sendiri atau F2, F3, dan seterusnya tidak bisa ditanam kembali. Jika ditanam kembali, kualitas dan kuantitasnya menurun atau tidak sebagus induknya. Oleh karena itu, benih harus disemai terlebih dahulu. 
http://tipspetani.blogspot.com/2018/04/teknik-menyemai-bibit-cabai-dalam-koker.html

Adapun cara penyemaiannya sebagai berikut : 

1.Persiapan Benih 
Benih cabai untuk keperluan penanaman di kebun dapat diproduksi sendiri, atau jika ingin mudah, benih dapat juga dibeli di toko – toko pertanian. Biji atau benih cabai diambil dari buah tanaman induk. Tanaman induk harus berasal dari tanaman yang sehat dan buah yang baik. Tanaman cabai yang dijadikan induk pun perlu dipilih yang berjenis murni. Jenis murni artinya tanaman yang tidak terbaur dengan tanaman yang sama atau dari jenis lain. Misalnya ; cabai merah jangan dibiarkan dengan cabai keriting. Selain harus berasal dari tanaman induk pilihan, buah cabai yang akan diambil bijinya harus berbentuk sempurna, tidak cacat, bebas hama penyakit, dan umurnya cukup tua. Buah yang memenuhi syarat di atas dipotong menjadi tiga bagian yang setiap bagiannya harus sama panjang. Biji untuk benih diambil dari potongan bagian tengah. Potongan bagian tengah ini umumnya memiliki biji yang lebih padat, lebih banyak, lebih besar, dan kemungkinan sudah mengalami penyerbukan sempurna. Potongan uyang dipilih itu dibelah, kemudian bijinya dikeluarkan untuk dijemur sampai kering.


Selain cara di atas, ada cara lain untuk mendapatkan benih yang baik. Buah cabai yang terpilih dapat langsung dikeringkan tanpa dipotong terlebih dahulu. Bila akan digunakan, buah cabai kering tersebut dipotong menjadi tiga bagian dan biji dari potongan bagian tengahnya saja yang diambil. Setelah biji cabai untuk benih diperoleh, tahapan berikutnya ialah melakukan seleksi biji untuk mendapatkan benih cabai yang baik. Seleksi ini bertujuan agar diperoleh benih cabai dengan daya tumbuh yang baik. Penyeleksian dilakukan dengan cara biji calon benih dimasukkan ke dalam ember atau bak berisi air dan diaduk-aduk. Dengan cara ini akan tampak adanya biji yang mengambang dan yang tenggelam. Biji yang menggambang merupakan biji yang kurang baik untuk benih. Biji ini merupakan biji yang tidak berisi (kosong). Sebaliknya, biji yang tenggelam merupakan biji yang berisi. Cara di atas merupakan cara untuk memilih biji sebagai benih yang baik dari buah yang terpilih. Namun, bagaimana kalau benih itu diperoleh dari pembelian yang sudah jadi. Cara memilih benih yang demikian pun sama dengan memilih benih dari biji yang diperoleh dari pengeringan sendiri. Selain persyaratan tersebut, biji calon benih pun harus memiliki ciri fisik yang baik. Ciri fisik ini antara lain bentuk, ukuran, dan warna harus seragam, permukaan kulitnya bersih, tidak keriput, dan tidak cacat, serta kulitnya berwarna cerah. 

2. Persiapan Media 
Penyemaian Media semai yang digunakan untuk penanaman cabai merupakan campuran dari tanah, pupuk kandang atau kompos, dan pupuk TSP (SP 36) ditambah dengan insektisida berbahan aktif karbofuran (missal : Furadan, Petrofur, Curaterr). Sebelum dicampurkan , tanah harus diayak dahulu . Hasil ayakan tanah inilah yang kemudian dicampurkan dengan pupuk kandang atau kompos. Pengayakan ini bertujuan agar butir – butir tanahnya seragam sehingga bibit nantinya mudah berkembang dan terbebas dari kotoran sisa perakaran dan kotoran lain .
http://tipspetani.blogspot.com/2018/04/teknik-menyemai-bibit-cabai-dalam-koker.html

Setiap tiga ember adonan tanah dan pupuk kandang ditambahkan 100 g insektisida karbofuran dan 100 g pupuk TSP atau SP 36 yang telah dilembutkan. Bila tidak ada TSP atau SP 36, pupuk tersebut dapat diganti dengan NPK sebanyak 80 g per tiga adonan tersebut. Penambahan TSP (SP 36) untuk merangsang pertumbuhan akar bibit, sedangkan penambahan karbofuran untuk mengendalikan serangan hama (terutama serangga dan nematode) yang terbawa di dalam tanah. Semua bahan yang telah disiapkan untuk media semai diaduk rata kemudian dimasukkan kedalam koker (bumbungan daun pisang) yang telah disiapkan. Pengisian media semai sebaiknya tidak terlalu penuh (cukup 90 % penuh) sambil ditekan – tekan. Untuk penataan koker, cara konvensional yang biasa dipakai adalah menggunakan wadah ceper, seperti kotak kayu, baki, atau tray setinggi 8 – 10 cm yang telah diberi beberapa lubang di bagian dasarnya untuk keperluan drainase. Kemudian tatanan koker diletakkan pada tempat yang terlindung, bisa pada bangunan persemaian setengah lingkaran yang ditutup plastik bening atau pada ruang persemaian (rumah bayang)

http://tipspetani.blogspot.com/2018/04/teknik-menyemai-bibit-cabai-dalam-koker.html
3. Perlakuan Benih 
Sebelum benih ditanam ke dalam koker, maka benih perlu diberi perlakuan terlebih dahulu agar mudah berkecambah dan bebas bibit penyakit berupa cendawan maupun bakteri. Perlakuan benih dapat dilakukan secara basah maupun kering. 


a. Perlakuan basah 
Benih yang akan disemai direndam dalam air yang telah diberi fungisida Previcur N 1,5 ml/l dan bakterisida Agrimycin/Agrept 1,2 g/l selama 4 – 6 jam kemudian benih di peram. Benih dibungkus dengan handuk basah atau kertas Koran yang dilipat dan dibasahi kemudian diperam di dalam bekas kaleng biskuit yang di dalamnya diberi penerangan lampu 15 W. 

Handuk atau kertas Koran harus selalu dijaga kelembabannya dengan cara disiram air secukupnya apabila terasa mulai kering. Setelah 3 atau 4 hari benih telah berkecambah 0,5 – 1,0 mm dan siap disemaikan. 

Cara lain sebelum disemai, benih yang terpilih direndam dahulu kedalam larutan fungisida sampai 12 jam dan dikeringanginkan hingga airnya kering. Setelah itu, benih ditebarkan ke tempat persemaian. Selain cara tersebut, ada lagi cara lain, yaitu benih direndam selama 10 menit dalam larutan hipoklorit 10 % yang kemudian direndam ke dalam air hangat (50°C) selama semalam


b. Perlakuan kering 
Perendaman benih dan pemeraman biasanya mempersulit penanaman benih ke koker karena kulit benih menjadi lengket dan sulit dipisahkan satu sama lain. Oleh karena itu, petani sering kali tidak melakukan perendaman benih, tetapi melakukan perlakuan benih secara kering. Benih yang masih dalam kantung kemasan dibuka dengan cara menggunting salah satu ujungnya. Kedalam kantong dimasukkan satu sendok teh fungisida Derasol 60 WP dan satu sendok teh bakterisida Agrimycin/Agrept. Bungkus kemasan dilipat kemudian dikocok – kocok sampai seluruh benih terselimuti fungisida dan bakterisida tadi. Setelah itu benih siap di tanam di dalam koker.


4. Persiapan bumbungan (Koker) 
Koker yang digunakan pada penyemaian benih cabai sebaiknya dilakukan dengan menggunakan daun pisang yang digulung dengan menggunakan paralon atau bambu sebagai alat bantu dengan ukuran koker tinggi ± 7 cm dan diameter ± 3 cm. Koker disusun di atas nampan persemaian yang telah di lubangi sebagai tempat membuang kelebihan air

Sebelumnya bumbung diisi dengan media campuran tanah halus, pupuk kandang matang halus, ditambah pupuk NPK yang dihaluskan serta Furadan. Bahan media semai tersebut dicampur merata, lalu dimasukkan ke dalam bumbungan hingga penuh. Benih cabai keriting yang telah direndam, disemaikan satu per satu sedalam 1,0 – 1,5 cm, lalu ditutup dengan tanah tipis. Berikutnya semua bumbung yang telah diisi benih cabai keriting disimpan di bedengan secara teratur dan segera ditutup dengan karung goni basah selama + 3 hari agar cepat berkecambah. Setelah itu segera lindungi dengan sungkup dari bilah bambu beratapkan plastik bening (transparan), pemeliharaan persemaian adalah penyiraman 1-2 kali/hari atau tergantung cuaca, dan penyemprotan pupuk daun pada dosis rendah 0,5 gr/liter air, saat tanaman muda berumur 10 – 15 hari, serta penyemprotan pestisida pada konsentrasi setengah dari yang dianjurkan untuk mengendalikan serangan hama dan penyakit. 

http://tipspetani.blogspot.com/2018/04/teknik-menyemai-bibit-cabai-dalam-koker.html
5. Penyemaian Benih 
Penyemaian benih dilakukan dengan baik agar dihasilkan bibit yang berkualitas. Untuk persemaian di koker daun pisang, benih ditanam sedalam 0,5 cm. Setelah benih dimasukan kedalam koker, di atas benih tersebut ditaburkan pupuk kandang atau kompos setipis mungkin. Benih yang sudah disebarkan atau ditanam harus dilindungi dari terpaan sinar matahari ataupun air hujan. Untuk itu, persemaian dalam koker (bumbungan daun pisang) harus diletakan di ruang persemaian atau dapat juga diteras rumah. Untuk memberikan kelembapan dalam perkecambahan benih, permukaan persemaian ditutup dengan kain yang dijaga kebasahannya setiap hari. Wadah semai dapat ditutup plastik agar kelembaban media stabil. Namun plastik harus rutin dibuka setiap hari pada saat media akan disiram. Kain atau kerudung plastik dibuka setelah benih tumbuh menjadi kecambah pada hari ke -3 atau ke-4. Meskipun telah menjadi kecambah, media semai harus tetap dijaga kelembapannya. Oleh karena itu, penyiraman harus dilakukan setiap hari. Selain penyiraman, kegiatan penyiangan tanaman di persemaian juga harus dilakukan minimal satu kali.


6. Penaungan 
Sebaiknya pembibitan diberi pelindung atau naungan yang terbuat dari kayu dan atap daun lalang atau bahan lain. Pembuatan naungan ini sebaiknya dibuat sebelum benih disemai supaya benih tidak terganggu ketika pembuatan naungan. Tempat persemaian diberi naungan (atap) dengan arah timur – barat. Untuk menghindari teriknya sinar matahari dan derasnya terpaan air hujan. 

Sabtu, 28 April 2018

PANDUAN OKULASI POHON NANGKA AGAR BERHASIL DAN BERTUNAS


Seperti yang kita ketahui buah nangka banyak mengandung nutrisi dan vitamin dan penanaman pun mudah nutrusi yang terkandung dalam buah nangka antara lain:

Saat masih muda pun buah nangka yang orang jawa bilang gori, bisa dibuat sayur atau orang jogja bilang gudeg yang populer di kalangan masyarakat jogja dan menjadi makanan tradisional pendamping nasi yang nikmat.

Pohon pun banyak manfaatnya diantara kayunya yang keras untuk bahan bangunan pohon dari nangka ini banyak menyimpan air jadi saat kemarau dia mampu bertahan.


Aroma dan bau buah nangka yang telah matang pun memiliki bau harum yang khas jadi saat anda panen buah nangka tetanga pasti tau. jadi alangkah baiknya jika kita berbagi.

Tapi dari sekian banyak kelebihan ada satu yang membuat buah yang satu ini tidak banyak di minati yaitu getah pohon nangka yang sangat lengket.


Meningalkan satu kekurangan tapi juga meningalkan semua kelebihan dan manfaatnya. apakah itu sebanding?. tentu tidak. Jika kita berfikir ada masalah pasti akan di hadirkan solusi. Ini dia solusi menghilangkan getah buah nangka yang lengket.
  • Dengan minyak goreng.
  • Dengan tepung.
  • Dengan selaput dari biji nangka itu sendiri. Caranya hanya dengan meremas selaput tersebut hingga muncul cairan yang licin untuk meghilangkan getah.
Langkah-langkah Cara Okulasi Pohon Nangka

Untuk yang pertama kita siapkan pohon nangka yang hendak akan kita buat okulasi atau batang bawah/rootstock.

A. Ciri rootstock yang baik dan mudah untuk di okulasi
  1. Besar pohon tidak terlalu kecil, juga tidak terlalu besar kira sebesar kira-kira sebesar jari kita.
  2. Sehat
  3. Besar pohon sesuai dengan umur
  4. Dan yang paling penting kambium pada pohon sedang aktif. Karena saat aktif itulah kulit tanaman mudah untuk di kelupas dan saat kambium aktif tanaman akan mudah dan cepat untuk menyembuhkan luka.

Sekarang pilih batang atas atau entres. Hati-hati dalam mencari entris ini karena ketepatan sangat menentukan hasil nantinya.

B. Ciri-ciri entres nangka yang baik antara lain

  • Sehat atau terhindar dari bibit penyakit.
  • Sudah ada bakal entres yang akan tumbuh. Dilihat hanya setitik mata tunas dan belum tumbuh sempurna.
  • Dari tanaman yang berkualitas ungul dan tahan terhadap hama.
  • Besar entres kira-kira sebesar pensil.
  • Entres tidak terlalu muda dan tidak terlalu tua.
C. Peralatan Untuk Okulasi Nangka

Sekarang persiapkan alat yang akan menunjang kita dalam melakukan praktik ini
Pisau okulasi harus yang tajam dan seteril
Plastik okulasi atau plastik biasa yg d tarik jadi panjang juga bisa.
Plastik untuk cungkup. Ini berguna agar kelembapan dan penguapan entres dapat terjaga.

D. Waktu yang tepat untuk melakukan okulasi

Alat dan bahan yang dibutuhkan sudah komplit saatnya melakukan praktik okulasi pada pohon nangka. Untuk waktu bisa pagi atau sore hari karena banyak pertanyaan tentang waktu ini. Alasanya adalah kenapa pada pagi hari karena pada saat itulah sinar matahari mengubah air dan mineral menjadi makanann menjadikan kambium aktif.

Kenapa sore hari karena pada saat itulah suhu menjadi stabil jadi entres tidak harus menahan terik sinar matahari di siang hari yang menyebabkan penguapan berlebihan dan menjadikan entres layu dan akan kering setelahnya. Dah !!! Sekarang lagsung ke praktik. Waktu sudah di pilih, alat dan bahan telah tersedia.

E. Praktek Cara Okulasi Pohon Nangka


  • Sekarang sayat pohon nangka bagian bawah lebar dan panjang sayatan disesuaikan dengan besar entres.
  • Setelah disayat potong sayatan tersebut dibagian tengah kemudian kelupas dari tengah sebagian ke atas dan sebagian ke bawah.
  • Sekarang ambil entris yang terpilih potong miring dibagian bawah dari mata tunas dan diatas mata tunas juga dilakukan potongan miring, potongan atas dan bawah yang miring tadi mendekat ke munculnya tunas.
  • Setelah itu sisipkan entres yang telah kita potong miring di bagian atas dan bawah tadi ke sayatan kulit yang ada pada batang bawah yang telah kita sayat sebelumya.
  • Dan saat sudah pas maka lagsung saja diikat dengan plastik okulasi yang telah dipersiapkan tadi. Ikat di bagian atas dan bawah potongan miring entres tadi. Potongan entres yang miring menyatu dengan kulit bagian dalam batang rootstock.
  • Pengikatan dengan plastik okulasi sebaikya tidak menutupi munculnya mata tunas karena saat entris tumbuh nanti tunas baru akan sulit untuk menembusnya dan bisa juga palah mati. Ingat juga Pengikatan tidak terlalu kuat dan tdak terlalu kendur.
  • Setelah kita lakukan semua maka sentuhan akhir adalah memberikan penyungkupan yang berguna untuk mengurangi penguapan dan agar terlindung dari air.

F. Perawatan Okulasi Nangka

Setelah semua di lakukan maka sabar dan tunggu kira-kira 14 hari atau di kira-kira, Jika entres tidak mati dan masih terlihat hijau cerah dan mata tunas sudah mulai terlihat. Nah itu kita sudah mulai lega karena bisa di bilang 70% sudah berhasil.


Dan Saat mulai terlihat mata tunas maka bisa dibuka cungkupannya karena jika tidak akan meerusak mata tunas karena mata tunas tidak mampu menembus cungkup. Setelah beberapa bulan dan dilihat telah sempurna menempel maka plastik pengikat hatus dilepas karena dapat mencekik tanaman jika dibiarkan.

Dan akhirnya selesai dalam melakukan praktik cara okulasi pohon nangka, tinggal menjaga pohon dengan pemupukan secara tratur dan tepat.
sumber : https://www.tutorialtanaman.com/

Jumat, 27 April 2018


Landscape Planning Concepts

Kurt M. Jones
Chaffee County Extension Director

When water supplies become stretched, many gardeners look upon their large lawns and wonder about converting it to low moisture plantings.   While lawns have their purpose, making them functional (having only what you need) instead of covering large areas of your lot makes good sense.  So, where do you begin?
Related image
Bubble Diagram Example
            First, explore your goals for your landscape.  Do you need an area for your pets or children?  Are there some places in your landscape that are difficult to maintain or keep watered?  Will you need to convert a portion of your existing lawn sprinklers to convert to a perennial bed?
            One trick that landscape designers start with when making a plan is to draw out the existing lot on paper, noting the location of difficult-to-move items like sidewalks, driveways, structures, and established trees.  From there, they draw a “bubble diagram” to note differing effects they wish to make, plant watering requirements, and other desired features such as patios or lawn areas.
            In moving from the bubble diagram to an actual plan, consider other effects that you may wish to accomplish.  If the focal point of your home is the front entrance, then consider plants that enhance that feature instead of blocking the view.  Larger plants like trees can be useful to help “frame” the house features.  When choosing plants for your landscape, be sure to consider not only the size of the juvenile plants, but also mature sizes as well.
One concept that we recommend is the right plant in the right place.  Keep in mind wind exposures, solar heating, and winter conditions when choosing plants.
            In choosing plants, there are several excellent resources available to you.  CSU Extension has many publications available, along with some additional web resources such as http://www.planttalk.org and http://www.answerlink.info which may be helpful.  The SE Colorado Water Conservation District has an extensive demonstration and research garden at their Pueblo location.  Their website, http://www.secwcd.org has many pictures of plants they have on their location, growing characteristics, and other helpful information about maintenance and other items. 
Mid-summer perennial garden
Finally, check with local nurseries to see what they have available and get their advice.  Our local nurseries have plants adapted to our environment and knowledgeable people on staff.  Try to approach them on less-hectic times/days so they have time to assist you!
Getting the right plants is an important step.  Soil preparation, correctly planting transplants, and watering are also very important and often overlooked or not adequately accomplished.  Simply adding 3 cubic yards of compost to every 1000 square feet of bed and incorporating that into the soil to a depth of 6-8 inches will lower your watering requirements, fertilizer requirements, and increase the plant vigor over no soil preparation.  Incorporating organic matter later is much more difficult.
For more information about landscape options, call your Extension office or visit us online at http://extension.colostate.edu/.

Beranda pertanian masa kini