Kamis, 26 Juli 2018

Paint my Garden Purple


by Vicky Barney
Unintentionally, my garden is a sea of purple flowers.  The flowers are blooming on a few natives and a non-native, all in shades of purple and all in bloom at the same time.  Before now, I would have thought that a garden of only purple flowers would be rather boring, but it is quite striking.

The wildflowers in bloom are Showy Daisy (Erigeron speciosus) and Rocky Mountain Penstemon (Penstemon strictus).  A few Harebells (Campanula rotundifolia) are scattered about as well.  The non-native plant is the Clustered Bellflower (Campanula glomerata).  The last was a surprise; its roots were intermingled with clumps of daylilies from a friend’s garden.  All are perennials, all have been spreading for the past few years, and each complements the others in appearance.

Showy Daisy, also called Showy Fleabane or Aspen Daisy, grows from 1 to 3 feet tall and produces 1-10 small flowers that perch on top of each stem.  With yellow centers and numerous thin petals ranging in color from pink to blue to lavender, the flowers are a nice landing spot for a variety of insects including butterflies.  It thrives in moist areas and aspen groves in the Rocky Mountains, as well as in xeric gardens.  The native has naturalized in my garden, blooming in swaths of lavender in sunny and partly shady locations, and may rebloom if deadheaded, but I’ve not had firsthand experience yet.

Rocky Mountain Penstemon is another native that thrives in our area.  Like the Showy Daisy, it grows tall, is happy in both sun and part shade, is drought tolerant, and spreads easily.  It’s striking blue-purple tubular flowers bloom up sturdy stalks and are frequented by bees and hummingbirds.  It spreads by seed and now blankets several of my flowerbeds.

Harebell, the smallest of my purple bloomers, appears here and there in my garden and will continue to bloom all summer long.  It has blue-lavender bell shaped flowers on thin stems that grow to about a foot tall.  Native to the Northern Hemisphere, it is also called Bluebell.  It will grow in sunny and shady areas, in dry to moist conditions, and reseeds readily.  It sometimes surprises me with white blooms.

The non-native purple flower I’ve inadvertently planted is also a bluebell and is called Clustered Bellflower.  It is the showiest of the bunch, its stem growing up to 2 feet tall and the deep purple bell shaped flowers forming a colorful ball on top.  The Clustered Bellflower has found a welcome spot in my garden – a sunny location that was irrigated for a time for the naturalizing daylilies – and is spreading by rhizome among the daylilies and in the grass nearby.  The daylilies keep the heavy flower heads upright and appear to be keeping the invasive plant in check.  Although not native, the flowers are regularly perused by bees and other insects, and it continues to thrive in the sunny location with minimal irrigation.  Its flowers are suitable for cutting.

My purple garden has been delightful, tranquil yet humming with pollinator activity.  I will be sad to see it disappear.   Yet the process has begun, with the purple color fading and flowers in other colors starting to bloom.  In no time, though, with a little added water and more summer sunshine, my garden will take on a new identity with new colors and textures to enjoy.  It’s a wonderful time of year in the garden.

Vicky Barney gardens for wildlife and is a member of the Master Gardener Class of 2011.

Kamis, 19 Juli 2018

Planting that Birthday Tree


by Kurt M. Jones
Chaffee County Extension Director
Sitting here on my back porch, looking past the potted rosemary and basil, I can see my son’s birthday tree in the back corner.  Grandpa and Grandma bought us a birthday tree in celebration of our son’s first birthday.  With an extension agent son-in-law, I’d better have planted it correctly!

Planting a tree correctly actually starts with tree selection.  We purchased a Colorado Blue Spruce for a couple of reasons.  First was because of our son’s being enamored with our tree during the holidays last December.  Second, this tree fit into our landscape plans well.  Finally, it is one of Dad’s favorites.  I almost forgot, be sure to call for utility locates a minimum of 3 business days prior to digging.  It is a free service, and it is the law!  Simply call 811 to begin the process.
After looking at the available trees in the nursery, I chose one that had a couple of features that I was interested in.  First, I was looking for a tree that had good shape, and more importantly, one “leader” branch that was vertical.  I was also looking at the root ball for two items: ease of handling without a tractor, and the presence of stabilizing roots in the top 2 inches of the rooting soil.  Roots that are deeper in the ball or potted tree have the danger of being planted too deeply, lessening the chances of establishment or long-term survivability.  The tree that I chose was one that was potted (rather than ball-and-burlap) so that I could move it through our fence with a furniture moving hand cart.  Larger B&B tree stock often requires specialized equipment to move due to the weight and rounded shape.  One drawback of potted trees can be the lack of root ball as compared with the size of the tree, so extra care may be needed to establish a potted tree as compared with B&B trees of similar height.
Digging a largesaucer shaped hole
After getting the tree home, it is time to locate it and dig the hole.  We chose a location that will allow for mature size of the tree.  It is also relatively level, and it is in a location that we can regularly irrigate year-round.  Many of the tree problems that I have seen this year can be attributed to our dry fall and early winter, necessitating year-round irrigation once the tree is established and during tree establishment.
The hole that I dug was saucer-shaped.  I dug it 2 inches shallower than the height of the tree ball, and the edges were 3 times the diameter of the root ball.  Yes, a big hole.  Tree roots will grow primarily in the top 12 inches of soil (rather than developing “tap roots”) and spread laterally from the base of the tree.  The depth is dependant upon the available moisture and oxygen levels in the soil; too shallow and there is inadequate moisture, too deep and oxygen levels diminish. 
Why the saucer shape?  Researchers have found that in some cases, tree roots can turn upon themselves when faced with a vertical soil texture change (like those faced with the conventional tree holes with vertical sides taught years ago).  Saucer-shaped holes lessen the likelihood of tree roots turning on themselves, eventually girdling the tree as they mature.  Digging the hole larger has been shown to increase root biomass eight times over similar trees with holes dug to fit the root ball.
Planting a tree can be a family activity
After digging the hole, I removed the plastic container and the burlap that was also present.  Though burlap will eventually degrade, I did not want it wicking moisture away from the tree roots or interfering with root establishment until it degraded.  My preference is to remove as much foreign material (wire cages, burlap, strings, pots) as possible when planting trees.
When I got the tree upright in the hole, I began backfilling.  I did not use any amended soil in my backfill, instead I planted the tree in an amended location.  Tree roots spread laterally from the base, so amendment is best accomplished throughout the rooting zone, not just in the backfilled hole.  I also water-packed the backfilled hole, rather than tamping or stomping in the soil around the tree roots.  My purpose in digging a large hole was to avoid soil compaction, so I will avoid activities that contribute to soil compaction around the tree.
Growing evergreens
Finally, I drove some wooden stakes through the root ball into the undisturbed soil underneath to help stabilize the tree during periods of higher winds.  Because this is a special tree to our family, I wanted to use underground stabilization rather than straps, wire and T-posts to hold it in place.  If you choose to do wrapping around the tree to stabilize it, make sure you use straps designed for that purpose, and remove the stabilization materials after the tree is established (approximately 1 year later).  I had the unfortunate opportunity to see some established trees planted about 8 years ago that succumbed to the girdling effects of tree wraps (lengths of garden hose with wire inside).  I also mulched the entire area of disturbed soil to help hold moisture and reduce weed establishment.
Though I did not use any, many people believe that root stimulation hormones should be used.  Though research is conflicted about using root stimulator, it does not harm the tree and may help with speeding up root establishment.  One practice that should not be used is nitrogen-based fertilization.  The goal after transplanting trees is to establish tree roots rather than producing tree branch growth.  Nitrogen fertilization during the first growing season has been shown to reduce root growth.  Finally, I watered the tree ball and surrounding soil.
The simple act of planting a tree.  It is a practice that has many opinions, but for our family, planting a “First Birthday Tree” is a neat tradition that I was proud to be a part of.  For more information about tree planting or care, contact your extension agent or the Chaffee County Extension office at 719-539-6447 or visit us online at http://chaffee.extension.colostate.edu


Kamis, 12 Juli 2018

Why some weeds are slated for eradication


by Irene Shonle CSU Extension Gilpin County
Why are there some weeds, such as List A noxious weeds myrtle spurge, orange hawkweed, and others, required by state law to be eradicated?  The answer is long and complicated. First, we must start with what makes a weed a noxious weed – it is a plant that is alien (not from this country) that has been shown to cause problems in natural or agricultural settings. To be declared noxious, they have to be proven bad actors, and only after scientists have reviewed the data, and it has passed through a legislative process. It is not just “someone’s” opinion.  Because these weeds are not from here, they do not deal with the same suite of insects and diseases that our native plants have to deal with, so they have a competitive advantage. They usually have a nasty tendency to form monocultures and crowd out native plants. This is certainly the case with myrtle spurge (and most other noxious weeds); if it is left alone, it will take over large areas over time.  

Hillside filled with myrtle spurge, a List A noxious weed
Next, we must look at the relative benefit to the ecosystem of native plants and alien plants.  Doug Tallamy, a professor from the University of Delaware (author of Bringing Nature Home), has been studying how native plants support the entire food chain and how alien plants do so to a much lesser degree.  His definition of a native plant is a functional one: "a plant that has evolved in a particular place long enough to be able to establish the specialized relationships that create an ecosystem".  Noxious weeds, by virtue of being alien, are newcomers to the area, and do not have these relationships.

Natives in nature
Native plants provide the bottom of the food chain, and the insects that eat the plants are the next rung – but they can’t eat just any plant. According to Tallamy, "with few exceptions, only insect species that have shared a long evolutionary history with a particular plant lineage have developed the physiological adaptations required to digest the chemicals in their host’s leaves. They have specialized over time to eat only the plants sharing those particular chemicals." Alien plants like noxious weeds do not have the chemical footprint in their leaves that spells ‘food’ for most insects.

One of the reasons we are seeing a sad decline in bird populations (overall, 40 percent of the world’s 11,000 bird species are in decline, according to the 2018 State of the World’s Birds report) is because so many of our plants around us are now not native – either noxious weeds or beloved garden plants. Almost all birds, even if the adults are seed eaters or fruit eaters, require thousands of insects to raise even one clutch of birds.

Myrtle Spurge up close,
Colorado List A noxious weed
Weeds such as myrtle spurge may have pollinator visitation, but they occupy space that would otherwise be used by native plants which provide pollinator services AND are host plants for many different insects.  Also, research from the Xerces Society shows that native plants are four times more likely to attract native bees than exotics – and native bees are also suffering declines, even though the non-native honeybees get all the press. So, while it may seem on the surface that removing one plant would reduce biodiversity (we all know basic subtraction, right?), the natives do a much better job of supporting the myriad insects and birds that depend on them.  In fact, Tallamy’s research shows alien plants support 29 times less biodiversity than do native plants.

Orange Hawkweed, Colorado List A noxious weed
The next question is why does the law state that list A weeds must be eradicated? This is because these weeds have relatively small populations so far in the state. That means we should not have to expend a lot of time and effort in bringing these weeds under control if we act now. It also means that we probably don’t have to do a great deal of remediation afterwards, because their populations aren’t that large; the native vegetation will be able to take over again with little to no intervention. We don’t want to leave pockets of these weeds around, because those populations would spread into new areas (they are weeds, after all), and weed managers would continuously have to be putting out these small (or sometimes large) fires. Sure, we could wait until a weed like myrtle spurge gets as bad here as it is in Utah: “we waited too long and this thing is now incredibly entrenched, and there just doesn’t seem to be an answer,” according to Utah Native Plant Society’s Tony Frates in reference to the huge monocultures that have formed in the Wasatch. Then we would have lost our window of opportunity.  
Example of garden with native plants

List A weeds are sort of like a disease – in a perfect world, we would be able to completely eradicate diseases such as we have done with small pox, rather than dealing with the trauma and loss of life of epidemics, and rather than continuously having to vaccinate against them.  If we can deal with these weeds now while their populations are still small, we don’t have to worry about them coming back, and we can spend time and energy on either dealing with some of the other weeds, or habitat restoration, or some other productive use. That is why some weeds are required by law to be eradicated.

Irene Shonle is the County Extension Agent at the CSU Gilpin County Extension Office located at the Exhibit Barn in Gilpin County.  For more information, visit www.gilpin.extension.colostate.edu.

Selasa, 10 Juli 2018

MELIHAT PROSES BAGAIMANA ORANG PAPUA MEMBUAT SAGU


Pohon aren atau enau tumbuh di lereng-lereng pegunungan. Sedangkan pohon rumbia tumbuh di dataran rendah yang banyak airnya. Pohon yang memiliki batang mirip pohon kelapa ini batangnya mengandung empulur yang bisa menghasilkan tepung yang bisa mengenyangkan perut seperti nasi.

Pohon Aren

Aren yang memiliki nama ilmiah Arenga pinnata ini termasuk tanaman serbaguna. Daun dan ijuknya bisa digunakan sebagai atap rumah. Buahnya menghasilkan kolang-kaling. Tandan buahnya bisa disadap niranya untuk diolah menjadi gula merah. Kulit batangnya yang keras biasa digunakan untuk bangunan rumah. Sedangkan empulur di dalam batang aren bisa menghasilkan tepung. Tepung aren bisa diolah menjadi bubur, mi, kerupuk, kue-kue, dan bakso. 

Tepung aren menghasilkan adonan yang kenyal. Petani sering mengolah tepung aren menjadi penganan atau mi yang bisa mengenyangkan perut.

Untuk membuat tepung aren, batang pohon aren ditebang dan dipotong-potong. Potongan batang aren dibelah dan diambil empulurnya. Empulur aren mengandung sel-sel parenchym yang menyimpann tepung. Untuk mengeluarkan tepung, empulur harus dihancurkan dengan cara diparut.

Hasil parutan empulur aren lalu disiram dengan air sambil dipisahkan dari serat-seratnya. Air tersebut akan melarutkan tepung dan mengendapkannya di dalam bak penampungan. Setelah tepung mengendap, airnya dibuang, dan tepungnya dijemur hingga kering.

Pohon Rumbia

Orang sering menyebutnya pohon sagu. Padahal aslinya bernama pohon rumbia atau Metroxylon sagu. Seperti pohon aren, manfaat pohon rumbiajuga cukup banyak. Daunnya lazim digunakan untuk atap rumah dan batangnya untuk kayu bakar. Di daerah Maluku dan Papua, pohon rumbiamenjadi tanaman andalan karena menghasilkan tepung sagu.

Untuk membuat tepung sagu, empulur yang terdapat di dalam batang sagudiparut dan disiram dengan air agar zat tepungnya larut dan mengendap di dalam wadah penampungan. Tepung sagu bisa langsung diolah menjadi bubur, tetapi bisa juga diawetkan dengan cara dikeringkan.

Tepung sagu bisa diolah menjadi kue-kue, bubur, mi, kerupuk, dan bakso. Pada zaman dahulu di daerah Maluku, orang belum merasa kenyang kalau belum makan bubur sagu atau papeda.
http://bobo.grid.id/

Pohon aren atau enau tumbuh di lereng-lereng pegunungan. Sedangkan pohon rumbia tumbuh di dataran rendah yang banyak airnya. Pohon yang memiliki batang mirip pohon kelapa ini batangnya mengandung empulur yang bisa menghasilkan tepung yang bisa mengenyangkan perut seperti nasi.


Teras batang sagu yang ditokok (dicacah) itu nantinya akan berupa ampas yang bisa dibuat menjadi tepung sagu.

Sementara Mama Angelina Kladit sudah siap-siap membawa karung untuk membawa ampas hasil panen. Setelah terkumpul satu karung, ia membawanya ke tempat meramas sagu, tidak jauh dari tempat menokok.

Di sana sudah ada alat untuk meramas ampas batang sagu, alat yang sederhana dari batang kayu.

Ampas yang sudah dikumpulkan disiram pakai air lalu diremas, berkali-kali, sambil disaring. Hasil ramasan dibiarkan mengendap.

Pati hasil ramasan kemudian diambil untuk dijadikan tepung sagu dan diolah menjadi beragam makanan.

Sagu basah dibawa dari hutan untuk diproduksi menjadi berbagai produk makanan. 

Kini, tepung sagu tidak lagi hanya diolah menjadi papeda (bubur sagu, makanan pokok mereka) atau dijadikan sagu kering untuk dijual.

Biasanya, sagu kering dijual hanya sekitar Rp200 ribu untuk satu tuman atau karung yang isinya 15 kilogram hingga 20 kilogram.

Warga Kampung Sira sudah mulai mengolah sagu menjadi berbagai jenis olahan lain, seperti mi, kue, keripik, dan cendol.

Sagu memang berlimpah di hutan mereka, tetapi selama ini belum bisa meningkatkan perekonomian warga secara signifikan.

"Harapannya dari sagu yang kami olah, penghasilan menjadi bertambah," kata Ketua Lembaga Pengelola Hutan Desa (LPHD) Alfred Kladit saat menemani kami ke hutan.

Alfred baru Desember tahun lalu mendapat pelatihan mengolah sagu menjadi beberapa alternatif makanan. Ia dan beberapa warga dikirim oleh organisasi lingkungan Greenpeace ke Sungai Tohor, Kabupaten Kepulauan Meranti, Riau, yang dikenal dengan produk sagunya hingga ke Malaysia dan Singapura.
Belajar mengolah sagu

Hutan di Kampung Sira merupakan bagian dari Hutan Desa Manggroholo-Sira, Sorong Selatan. Warga Kampung Sira berhak atas 1.850 hektar.

Setelah mendapatkan hak Hutan Desa sejak setahun lalu, yang merupakan Hutan Desa pertama di Papua, mereka berupaya meningkatkan perekonomian dari hasil-hasil hutan, termasuk dari sagu.

Mereka berharap bisa mengikuti jejak masyarakat Sungai Tohor, Riau, yang sudah berhasil meningkatkan nilai ekonomi sagu dengan mengolahnya menjadi beragam makanan, bahkan pasarnya sudah meluas ke Malaysia dan Singapura.

"Kami berharap ketika kami bisa mencari pasar untuk masyarakat di kampung Manggroholo dan Sira, program sagu ini bisa secara kontinyu diproduksi oleh masyarakat," kata Juru kampanye Hutan Greenpeace Indonesia Charles Tawaru, yang selama ini mendampingi warga Manggroholo-Sira.
Olahan sagu yang akan diproses menjadi mi. 

Salah satu produk dari sagu yang sedang dicoba adalah mi sagu.

Tepung sagu yang dibawa dari hutan, diolah sampai kemudian menjadi mi. Prosesnya sebenarnya tidak begitu rumit. Tetapi alat yang dimiliki warga di Kampung Sira masih untuk skala kecil.

Produk-produk dari sagu yang dibuat masyarakat Kampung Manggroholo dan Sira baru saja dicoba dipasarkan di koperasi kampung "Koperasi Kenamandiri", di Kota Teminambuan, Kota Sorong, dan beberapa sampel di bawa ke Jakarta.
Copas :
- http://bobo.grid.id/
- (ANTARA News/Monalisa)

Kamis, 05 Juli 2018

Yikes! My garden grew too big! What to do?


by Nan Porter
Yard with flowers and rocks
I started my garden many years ago when there was a 20 to 30 minute rain practically every afternoon.  I would expand every summer with more wildflowers and perennials.  The garden grew and grew and grew.  Then the rains stopped and I had to water by hand since we are in the country on a well. The ground around my flowers is rock hard since I only watered the plants individually.  That took about 2-3 hours every other day. I weeded, and weeded and weeded. Oh, and I got a horse that I wanted to ride.  Hmm, should I pull weeds or go ride my horse?

I had to figure out what to do.  I didn’t want to kill my sparse flowers that were significantly getting even sparser the drier the climate got.  I had used river rocks for borders.  I love rocks, collected them on walks, vacations, even got a ton for a Mother’s Day present a few years ago! 

River rock and flagstone
The answer to my dilemma: ROCKS!   I decided to fill in the borders with more river rocks. Then I decided to add rocks where there were bare or weed infested spots.  At first I only wanted river rocks, but they didn’t cover much ground.  My husband decided to jack hammer up some big rocks buried in the ground in a small pasture.  I used all the jagged pieces from the project.  I continued to look for river rocks to put in the flower garden.

Then my husband decided to make flagstone steps and there were pieces left over.  The leftover flagstone covered way more ground than the river rocks. Flagstone joined the river rocks in the flower garden.

I found a partial flat of flagstone on sale and filled more spots!   However, I still needed more.  I bought a full pallet to cover more area.  Wow, flagstone is expensive! I ran out of garden money so I will have to wait another year for more flagstone.

Overview of garden with rocks
My problem of weeding and watering is slowly getting solved with rocks! From the pictures you can see the different sizes and types of rocks I have used.  I think the different sizes and types compliment the rugged look of the garden. I still plan to add a pallet a year to the garden for a few more years.  My garden is becoming manageable!  I have time to ride and less weeding!  I still need to water.  I think my next project will be to learn how to put in a drip system!

I now have a garden of flowers and rocks!!!  (I might add some bushes next!)

Nan Porter (Master Gardener class of 2017) gardens on a well at 7100 ft.  She is a gardener, barrel racer, and photographer (Nan Porter Photography).

Minggu, 01 Juli 2018

PANDUAN MUDAH MELIHAT KADAR KEASAMAN TANAH

https://tipspetani.blogspot.com/2018/07/panduan-mudah-melihat-kadar-keasaman.html

Tanah merupakan faktor penting dalam budidaya pertanian. Selain sebagai media tanam, tanah juga berfungsi untuk menyediakan unsur-unsur hara pendukung pertumbuhan tanaman. Karena itu untuk mendukung keberhasilan usahatani penting kita ketahui kondisi tanah, apakah terlalu asam, netral atau basa. Kondisi tanah yang ideal untuk budidaya adalah pada pH netral (6-7).

pH memiliki ukuran dari 0-14, tanah dengan pH 0-7 masuk dalam kategori asam sedangkan tanah dengan pH 7-14 masuk dalam kategori basa. Tanah netral memiliki pH 7. Tanah dengan pH yang rendah ataupun tinggi akan mempersulit tanaman dalam menyerap unsur hara. Yang artinya tanaman mampu menyerap unsur hara secara optimal pada pH netral.
Banyak sekali yang menyebabkan pH tanah menjadi rendah, yaitu :

  • Curah hujan yang tinggi mengakibatkan tercucinya unsur hara pada tanah, kemudian berimplikasi pada terbentuknya tanah asam,
  • Adanya unsur Al (alumunium), Cu (tembaga), dan Fe (besi) yang berlebihan,
  • Lahan yang tergenang air secara terus menerus karena tata drainase air yang tidak baik,
  • Dekomposisi bahan organik dari dalam tanah,
  • Penggunaan pupuk kimia yang berklebihan,
  • Secara umum pengertian dari tanah asam / ber pH rendah adalah tanah yang kekurangan kalsium dan magnesium.

Banyak cara untuk mengetahui tanah tersebut asam atau basa, baik secara tradisional maupun menggunakan alat ukur :

Secara Tradisional
1. Cara sederhana mengetahui pH tanah di lahan pertanian asam atau tidak, cukup dengan melihat apakah di lahan tersebut terdapat tumbuhan Melastoma malabathricum. Jika tanaman tersebut tumbuh, maka mengindikasikan lahan tersebut memiliki pH asam atau dibawah 7

https://tipspetani.blogspot.com/2018/07/panduan-mudah-melihat-kadar-keasaman.html
Melastoma malabathricum

2. Menggunakan kunyit seukuran jempol tangan
Potong menjadi dua bagian. Langkah berikutnya adalah mengambil sampel tanah dari empat ujung titik lahan di tambah pada bagian tengah, kemudan di aduk dalam sebuah wadah dan dibasahi dengan air. Masukkan satu bagian kunyit yang sudah dipotong ke dalam tanah ± 30 menit. Lalu angkat, kemudian perhatikan dan bandingkan warna potongan kunyit yang telah dimasukkan ke dalam adonan tanah dengan potongan yang tidak di masukkan. Jika warna kunyit menjadi pudar makan dapat dipastikan lahan tersebut memiliki kadar keasaaman tinggi atau pH di bawah 7. Jika warna kunyit tetap, pH tanahnya netral. Sedangkan, jika warna kunyit menjadi biru, maka tanah bersifat basa dengan pH di atas 7.
https://tipspetani.blogspot.com/2018/07/panduan-mudah-melihat-kadar-keasaman.html
kunyit

Menggunakan Alat Ukur
Cara pengukuran pH secara tradisional memang tidak akurat secara tepat, sebah hanya mengetahui tanah asam, netral atau malah basa. Sehingga akan sulit memberikan perlakuan pada tanah, oleh karena itu perlu dilakukan cara pengkuran yang terukur dengan menggunakan alat. Alat yang dapat dipergunakan adalah :

1. Menggunakan kertas lakmus atau pH indicator. Langkahnya dengan mengambil sampel tanah dari keempat titik ujung lahan ditambah satu titik di tengah, kemudian dicampur rata. Selanjutnya campur dan aduk secara merata menggunakan air, dengan perbandingan 1:1.
Biarkan selama 15 menit sehingga air dan tanahnya terpisah (mengendap) dalam wadah. Lalu masukkan ujung kertas lakmus atau pH indicator tadi selama 1 menit. Usahakan jangan mengenai tanah. Setelah warna kertas lakmus stabil segera angkat. Lalu cocokkan warna yang ada pada kertas lakmus dengan bagan warna.

https://tipspetani.blogspot.com/2018/07/panduan-mudah-melihat-kadar-keasaman.html
lakmus

2. Menggunakan pH meter dengan memasukkan ujung alat pH meter pada keempat ujung titik ditambah satu titik dari tengah lahan. Hasil yang diperoleh langsung dalam bentuk angka yang sudah dirata-ratakan. Skala keasaman tanah dapat dilihat secara langsung, sehingga mempermudah pemberian dosis dolomite atau kapur pada lahan jika lahan tersebut memiliki pH yang rendah (asam).

https://tipspetani.blogspot.com/2018/07/panduan-mudah-melihat-kadar-keasaman.html
pH meter

Secara umum, setiap kekurangan 1 tingkat dari pH 7(netral) membutuhkan 2 Ton dolomite setiap hektar. Contoh hasil pengukuran pH tanah 5 maka untuk menaikkan menjadi 7 jika ukuran tanahnya 1Ha maka membutuhkan 4 Ton Dolomite. Pemberian dolomite dilakukan sebelum tanaman ditanam atau benih ditabur.

Daftar pustaka

Wawan K. 2015. Tabloid Sinar Tani Edisi 18-24 Maret 2015

Kamis, 28 Juni 2018

Container Gardening

Containers come in a variety of sizes and shapes
by Barbara Sanders
Small spaces in the yard, on a patio, or on a deck are great growing places for container gardens.  If you are just starting, keep it simple.

Decide what to plant- Lettuce seeds can be started now.  For all seeds, read the directions on the packet. Other choices include: spicy greens such as mustard and Arugula (rocket), radishes, green onions (scallion), cilantro (coriander), dill, and spinach. Or purchase potted herbs from a nursery.  A few fun ones are: chives, oregano, parsley, basil, thyme, borage. If conditions are a bit drier, or in a separate pot: rosemary and sage (you may need to bring them in for the winter, as they are not hardy in most mountain areas). Adding annuals is fun too: salvia, zinnia, marigolds, nasturtiums.

Find a good location- Easy to walk to, water nearby, and light. Light is most important. Many seed packets and garden books suggest “full sun”. Well, our Colorado sun will burn most greens! My suggestion is “dappled” sun. Aspen trees offer light shade. Six hours of light per day is optimum.
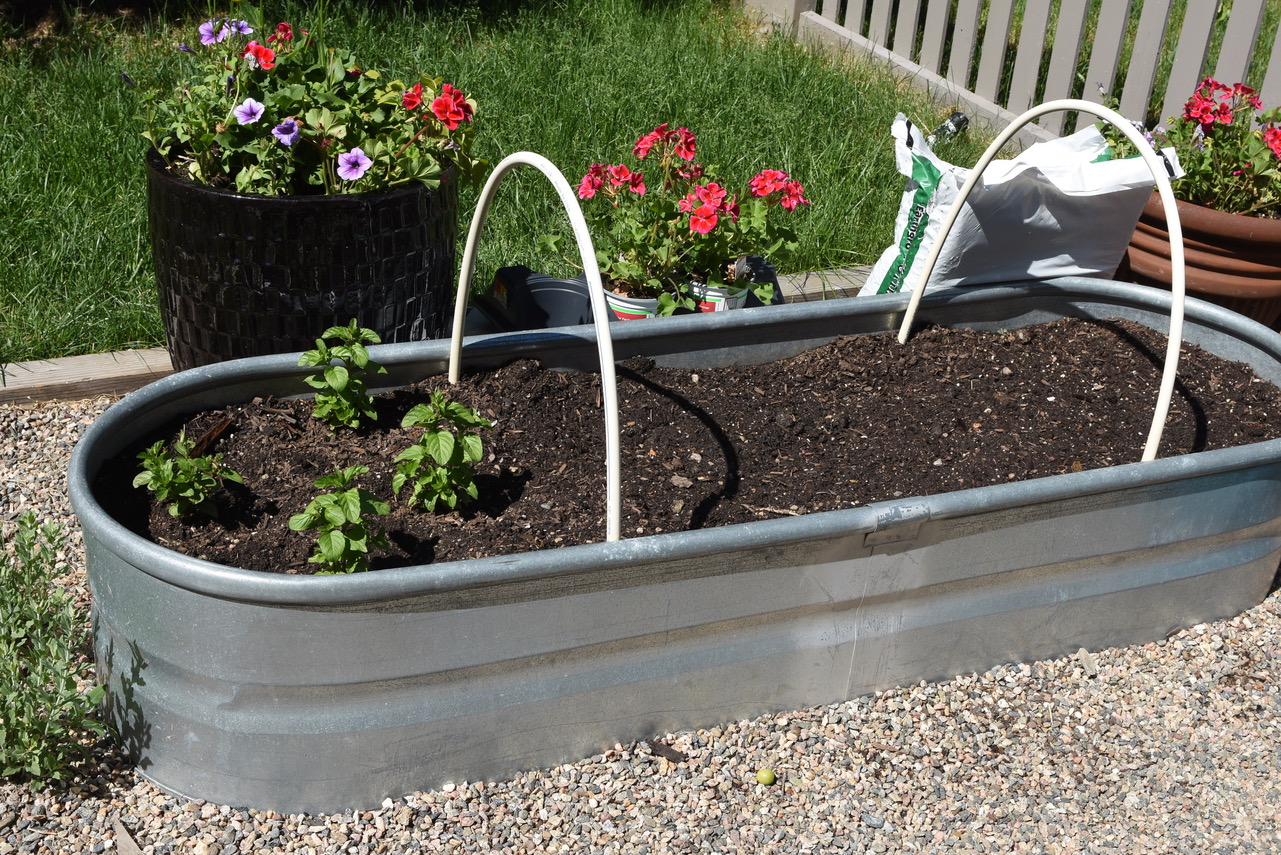
Even a water trough can be used as a planter

Choose a container- Recycling places have a variety of containers and many creatively adaptable choices. Look for one with a hole in the bottom to allow the water to drain. You can drill a hole if needed. Because of our dry conditions here, non-porous containers are preferred or the plants will dry out too fast. Remember, the bigger the container, the heavier it will be when filled with dirt.

Fill the container with soil- Best to use the “soil-less” mixtures as they are lightweight and “plant ready”. Garden dirt and/or “topsoil” are heavy with clay particles which don’t allow the plant roots to breathe, and may contain weed seeds and disease organisms. Do not put pebbles in the bottom of the pot, as this does not improved drainage, and can cause a perched water table. Very little soil will come out of the hole. Fill the pot up to 1 inch below the rim. With a large container, you may want to start with Styrofoam packaging peanuts as they are inert and lightweight. A piece of landscaping cloth can be used on top before adding soil.

Now your container is ready for seeds or plants- With seeds, follow packet directions.  With nursery grown plants, check the roots before potting. If they seem winding around the root ball, gently untangle them to allow them to spread out.  Place the plants as deep as they were grown at the nursery. Press into the new soil firmly. Spacing and design is a matter of choice. Lettuce seeds can be started amongst the herbs, eventually filling in any spaces.

Water until the water drains from the bottom of the pot, then wait until the first inch of soil becomes a bit dry before watering again. Then water until water drains from bottom. If the soil pulls away from the edges of the pot, it has been allowed to get too dry. You will be watering frequently, welcome to Colorado!  Some folks use polymer crystals which expand with water. In theory, they should provide water for the plants, but in reality, they don't supply enough moisture.

Maintaining this oasis is pretty straight forward- pinching growing tips allows the plant to fill out, removing dead flowers and leaves makes the container attractive. Fertilizing is a must. A water-based fertilized added to your watering can is best. Follow instructions on the product label. You may also have some visiting insects: aphids, earwigs, slugs, caterpillars, etc. There are websites to help identify the good and bad.  Look for advice for food crops. Aphids are a pain. Water spray removal may uproot your garden. A soap-based product will work but follow the directions carefully. Earwigs can be trapped in rolled newspaper. Slugs can be sprinkled with table salt but be careful of adding too much salt to your soil. For caterpillars, the abrasive nature of Diatomaceous Earth cuts holes in their exoskeleton and dehydrates them.

Sources:
www.ext.colostate.edu          Fact Sheet No. 7.238 CMG GardenNotes#731
www.migarden.msu.edu        Successful Container Gardens

The Vegetable Gardener’s Container Bible by E. Smith
The Salad Garden by Joy Larkham  (English Author)
The American Horticultural Society Encyclopedia of Gardening by C. Brickell. Ed.

Barbara Sanders and her husband moved to Steamboat from Hawaii in 1997.  She learned about Colorado plants and trees through the Master Gardener program and while volunteering at the Yampa River Botanic Park.  Barbara finds native plants most interesting as “they are adapted to our crazy, changeable climate and to our different soils” and her vegetable garden the most fun, which she tends with her husband, Bill.

Kamis, 21 Juni 2018

Mountain Snowberry


by Vicki Barney
A number of native shrubs have bloomed spectacularly this spring:  fragrant chokecherries with trailing blossoms, serviceberries with bursts of blooms, mountain ash with flat-topped flower clusters.  But it is the little Mountain Snowberry that catches my eye this time of the year.

Snowberry in bloom
Mountain Snowberry (Symphoricarpos rotundifolius (oreophilus)) is one of a variety of snowberries native to our area.  A small deciduous shrub in the honeysuckle family, it grows 1 to 5 feet tall and is currently blooming under the shrubs and aspens along our trails, as well as out in the undisturbed meadows.  The flowers are not showy and consist of clusters of small light pink bells at the ends of branches.   In the fall, it produces clusters of showy white berries that when broken open, reveals fruit that looks like “fine, sparkling granular snow.” (https://en.wikipedia.org/wiki/Symphoricarpos)

Mountain Snowberry is a wonderful addition to the wildlife garden.  The shrub is attractive with an arching growth habit and small rounded leaves.  It attracts pollinators – bees, butterflies, moths, and hummingbirds – and is both a host and a food plant.  It also provides food and shelter to birds and small mammals, as well as early spring forage for deer and elk.  Rated for USDA plant hardiness zones 2-7, it thrives in all types of soils, and once established, is fairly drought tolerant. 

Mountain Snowberry, however, might not be right for your garden.  One garden website warns that it may not be the best behaved shrub because it spreads via rhizomes and may be thicket-forming without regular pruning.  It also is prone to disease if growth is too dense and, while the berries are beneficial to wildlife, they are toxic to humans.  Ingesting more than a couple of berries may cause vomiting, diarrhea, dizziness and sedation.   Last, like many natives, it may be hard to find at a nursery.

Mountain Snowberry
Colorado State University Extension has a great publication that is helpful to gardeners interested in planting native shrubs called “Native Shrubs for Colorado Landscapes.” (http://extension.colostate.edu/docs/pubs/garden/07422.pdf)  It includes tips for planting and advice for all steps of the process, including purchasing the shrubs from commercial nurseries.  It explains why one should not collect them from the wild – the practice reduces biodiversity and encourages weeds – and touches on issues around finding native plants for purchase.  In fact, I’ve have found it difficult to purchase some native plants locally. Deciding Mountain Snowberry would be an appropriate addition to my wildlife garden, I purchased and planted “snowberry” shrubs a couple of years back.  Unfortunately, I did not order them by their Latin name (Symphoricarpos rotundifolius/oreophilus), so I am not sure what I received. Per Karen Vail’s Garden notes in Edible & Medicinal Plants of the Southern Rockies, ”There is a dizzying variety of snowberries available in nurseries, unfortunately most of them misnamed.”  

Are my shrubs the native Mountain Snowberry?  If not, are they wildlife friendly? Are they thriving? Are they pretty?  They don’t look quite like the native shrubs in my neighborhood: arching growth habit, small oval leaves, and spring flowers.  My shrubs are more robust and have larger odd shaped leaves, but they are thriving and attractive.  They are also wildlife friendly as they have leafed out early and are sheltering birds.  They have not yet bloomed, though, so may not provide food for wildlife.  Perhaps they will bloom later this season as they are in a shadier spot. I will wait and see and, in the meantime, will enjoy the pretty green shrubs that are drought tolerant and maintenance free.
Vicky Barney gardens for wildlife and is a member of the Master Gardener Class of 2011

Beranda pertanian masa kini